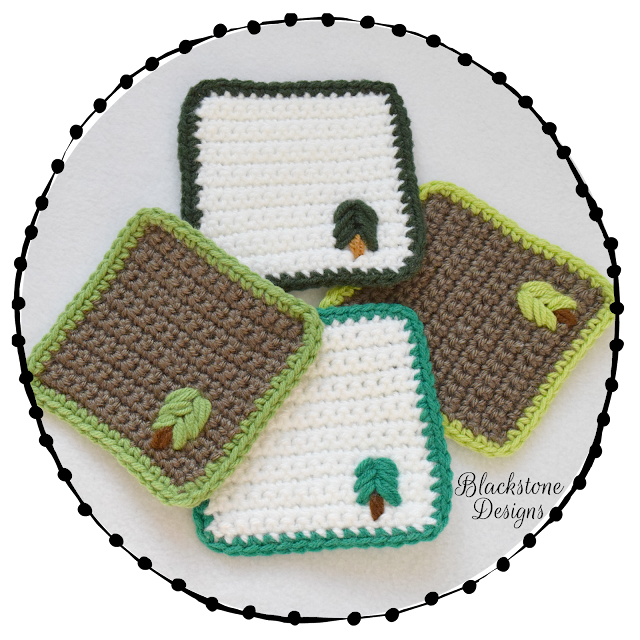
Don't you just love the rustic theme? I'm so in love with it right now and tree prints are really stealing my heart. And that's how these cuties were born!
Disclaimer: This post contains affiliate links
The problem was, once I started making them, I couldn't decide on which colors I really wanted! So, I just decided to make a mix instead. I think the dark green and white may be my favorite, but it's also Christmas time, so that could be playing a part in it!
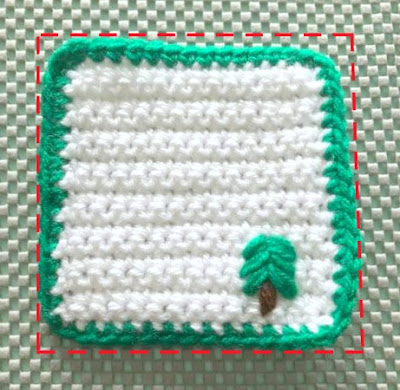
The coasters are worked up in a simple stitch work, and then the trees are added on at the end with a needle.
Here's how to make your own:
Little Tree Coasters
Materials
Neutral - 25 yards
Green - 10 yards
Brown - 20 inches
Optional Materials
Gauge
Not important for this project
Size
4.5” x 4.5” [11.4 cm x 11.4cm]
Stitch Guide
arnd = around
ch = chain
sc = single crochet
sl st(s) = slip stitch(es)
st(s) = stitch(es)
Skill Level
Easy
Notes
Instructions
PANEL
With Neutral,
1. Ch 15, sc in 2nd ch from hook and in each ch across, turn (14)
2. Ch 1, sc across, turn (14)
3-16. Repeat row 2
With Green,
17. Ch 1, sc in end of each row and in each st arnd; Fasten. (60)
TREE
With Green,
*Thread needle with green yarn and insert from the back into the space between the 3rd & 4th stitches and 6th & 7th rows. Bring green diagonally down and insert from the front through the space between the 2nd & 3rd stitch and 4th and 5th rows. Repeat this step 2 more times.
Insert needle from the back through the same beginning space and work diagonally down to the space between the 5th & 6th stitch and 4th and 5th rows. Repeat 2 more times.
*Insert needle from the back through the space between the tree ‘branches’ just created. Bring it diagonally down to the space between the 2nd & 3rd stitch and 3rd & 4th rows. Repeat 2 more times.
Insert needle from the back through the same space this branch set started and work diagonally down to the space between the 5th & 6th stitch and 3rd & 4th rows. Repeat 2 more times.
*Insert needle from the back through the space between the 2nd set of tree ‘branches’ (just created). Bring it diagonally down to the space between the 2nd & 3rd stitch and 2nd & 3rd rows. Repeat 2 more times.
Insert needle from the back through the same space this branch set started and work diagonally down to the space between the 5th & 6th stitch and 2nd & 3rd rows. Repeat 2 more times.
With Brown,
*Insert needle from the back through the space between the 3rd set of tree ‘branches’ (which is the space between 3rd & 4th stitch and 3rd & 4th rows). Bring straight down and insert from the top through the space between the 3rd & 4th stitches and the 1st & 2nd rows. Repeat 2 more times.
<SEE PHOTO TUTORIAL BELOW>
Finishing
I'd love to see your finished projects! Join the Blackstone Designs Crochet Community on Facebook to share your work, get pattern support, and so much more!
Hope to see you there!!
And don't forget to add this pattern to your Ravelry favorites and Pin it for later, so you can always find it!
Written pattern and photographs © 2017 Sonya
Blackstone of Blackstone Designs. Please do not sell, share, or modify
this pattern, but instead share the link to where the pattern can be
found. You may sell items you make with this pattern. This pattern, as
with all Blackstone Designs/Sonya Blackstone patterns, are not for
educational use without written permission from the designer.
Blackstone Designs is a participant in the Amazon Services LLC Associates Program, an affiliate advertising program designed to provide a means for us to earn fees by linking to Amazon.com and affiliated sites.
Labels: Christmas, Coasters, Coffee Coaster, decor, Free Crochet Pattern, home decor, Mug Rug, Pine Tree, Rustic, Textured, Tree, Wine Coaster